26 May 2016

Configuring SNMP on Cisco Prime License Manager & Prime Deployment Manager

Most Cisco Collaboration products that leverage the Cisco VOS platform, such as Unified Communications Manager, include a Serviceability graphical administrative interface. Prime License Manager (PLM, a.k.a. Enterprise License Manager or ELM) does not include this when installed as a stand-alone virtual machine. Similarly, Prime Deployment Manager (PCD) does not provide a graphical Serviceability interface. Instead, configuring SNMP is available only through the Command Line Interface. While neither product appears to provide a CLI Reference Guide directly, they share the Cisco VOS platform and therefor the CLI syntax which is documented for UCM. Unfortunately the guide does not provide examples of each command and it turns out that there are a few limitations compared to the GUI.

I wrote this post after a customer asked that I configure SNMP on all of their Cisco Collaboration applications and being unable to find a definitive set of instructions for how to complete this on PLM and PCD.

SNMP v2c Community String

You can add, view, modify and even delete SNMP community strings within the utils snmp config 1/2c community-string sub-commands. The CLI command appears to have one limitation compared to the GUI of supporting only a single IP address if you wish to limit the source IPv4 address that can use that string. Every separator I tried (e.g. space, comma, semicolon, etc.)  caused the script to fail. If you have multiple SNMP source addresses I'd recommend leaving it at ALLHOSTS instead of creating separate per-source community strings since neither PCD or PLM have especially sensitive data on them.

admin:utils snmp config 1/2c community-string add

ctrl-c: To quit the input.


Enter the community string:: examplereadonly
Enter the access privilege [ReadOnly]:: 
Enter the ip address to accept packets from. This is an optional parameter. Default is to accept packet from all hosts [ALLHOSTS]:: 
SNMP Master Agent must be restarted for changes to take effect. Would you like to restart this service now? [yes]:: no

The access privilege defaults to ReadOnly but will accept the following options: ReadOnly, ReadWrite, ReadWriteNotify, NotifyOnly, ReadNotifyOnly, or None.

For comparison, here is how the same community string is created on Unified Communications Manager, Cisco Unified Serviceability under the SNMP > V1/V2 > Community String option of the drop-down menus.
A screenshot of a community string being added through the Cisco Unified Serviceability graphical interface.
Figure 1 - Screenshot of Cisco Unified Serviceability SNMP Community String Configuration

MIB2 Contact & Location Details

The nearly universal MIB2 provides OIDs for System Contact (1.3.6.1.2.1.1.4) and System Location (1.3.6.1.2.1.1.6). These can also be set through the CLI. As with the community string it appears there is one limitation not present through the GUI: the input script does not support spaces, @ signs, or likely any other non-alphanumeric characters.

admin:utils snmp config mib2 add 

ctrl-c: To quit the input.


Enter the sysContact information:: ExampleAdmin
Enter the SysLocation information:: ExampleSiteName
Service Manager is running
SNMP Master Agent[STOPPING]
Commanded Out of Service
SNMP Master Agent[NOTRUNNING]
Service Manager is running
SNMP Master Agent[STARTING]
SNMP Master Agent[STARTED]
admin:

For comparison, here is how the same community string is created on Unified Communications Manager, Cisco Unified Serviceability under the SNMP > System Group > MIB2 System Group option of the drop-down menus.
A screenshot of the MIB2 System Contact and System Location being set through the Cisco Unified Serviceability graphical interface.
Figure 2 - Screenshot of Cisco Unified Serviceability MIB2 System Group Configuration 

SNMP Traps

Even though there isn't a graphical interface the underpinning requirements are the same. Anything that you cannot configure on the Cisco Unified Serviceability graphical interface is also blocked through the equivalent CLI command. Understanding this becomes helpful when you attempt to configure an SNMP trap because the command will fail if you have not already created a community string with NotifyOnly, ReadNotifyOnly, or ReadWriteNotify privileges.

Example output when the community string referenced in the trap does not exist.
admin:utils snmp config 1/2c trap add

ctrl-c: To quit the input.


Enter the ipaddress of notification destination.(Note: Do not specify own IpAddress):: 10.1.70.242
Enter the portno [162]:: 
Enter the version v1|v2c [v2c]:: 
Enter the community string:: example trap
SNMP Master Agent must be restarted for changes to take effect. Would you like to restart this service now? [yes]:: yes
Invalid community string: example trap
Cannot execute the command

To successfully create an SNMP trap or inform destination you must first create a community string.
admin:utils snmp config 1/2c community-string add
[system will prompt you for the parameters]

Note: "SNMP Master Agent" Service will be restarted for configuration changes to take effect. Do not abort command after execution until restart is complete
      If command is aborted during service restart, verify service status of "SNMP Master Agent" using command "utils service list"
      If service is down, start it using command "utils service start SNMP Master Agent"

admin:utils snmp config 1/2c community-string add

ctrl-c: To quit the input.


Enter the community string:: example trap
Enter the access privilege [ReadOnly]:: NotifyOnly
Enter the ip address to accept packets from. This is an optional parameter. Default is to accept packet from all hosts [ALLHOSTS]::
SNMP Master Agent must be restarted for changes to take effect. Would you like to restart this service now? [yes]:: no
admin:utils snmp config 1/2c trap add

ctrl-c: To quit the input.


Enter the ipaddress of notification destination.(Note: Do not specify own IpAddress):: 10.1.1.100
Enter the portno [162]:: 
Enter the version v1|v2c [v2c]:: 
Enter the community string:: exampletrap
SNMP Master Agent must be restarted for changes to take effect. Would you like to restart this service now? [yes]:: yes
Service Manager is running
Commanded Out of Service
SNMP Master Agent[NOTRUNNING]
Service Manager is running
SNMP Master Agent[STARTING]
SNMP Master Agent[STARTED]
admin:

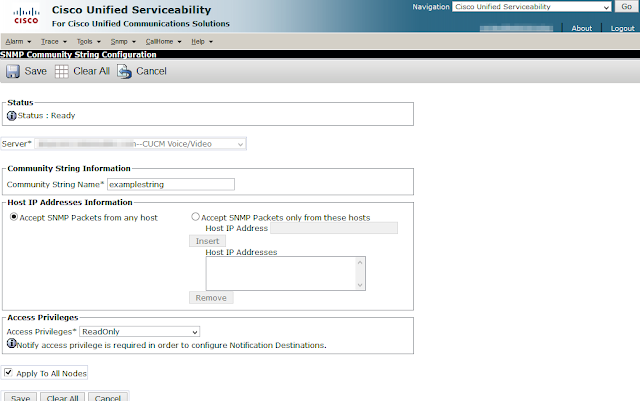
All of this directly maps to the options that exist within the Serviceability graphical interface. For comparison, here is how the same community string is configured on Unified Communications Manager, Cisco Unified Serviceability under the SNMP > V1/V2 > Community String option of the drop-down menus.
A screenshot of a community string being added through the Cisco Unified Serviceability graphical interface. The Access Privileges dropdown is expanded to show the six options: ReadOnly, ReadWrite, ReadWriteNotify, NotifyOnly, ReadNotifyOnly, or None.
Figure 3 - Screenshot of Cisco Unified Serviceability SNMP Community String Configuration

After creating a community string with the Notify privilege the trap destination can than be defined. Again, using UCM as a graphical example under the SNMP > V1/V2 > Notification Destination option of the drop-down menus.
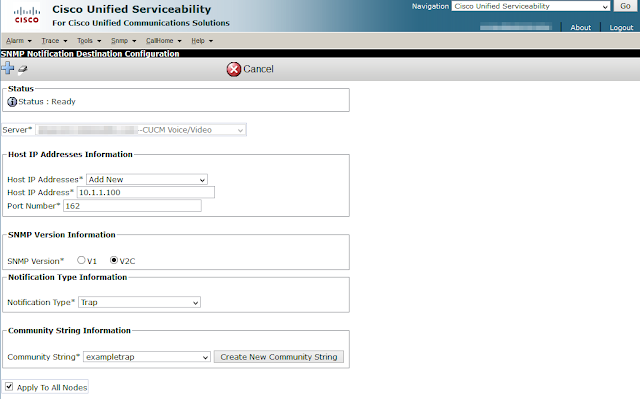
A screenshot of a trap destination being added through the Cisco Unified Serviceability graphical interface.
Figure 4 - Screenshot of Cisco Unified Serviceability SNMP Notification Destination Configuration

16 April 2016

Jabber File Transfer & Which Extensions to Block

Cisco Jabber provides the ability to send files between users, either peer-to-peer or proxied via the IM&P server when Managed File Transfer feature (MFT) is configured. The MFT feature also is required when one or both users are connected using Mobile and Remote Access (MRA). It is also required for ad-hoc and persistent chat rooms to support file sharing. As an added bonus, this supporting file transfers within Jabber will likely reduce the use of email as a file transfer protocol.

The concern that immediately gets raised by customers is the risk of malware being propagated through Jabber. In addition to ensuring anti-malware software on both the sending and receiving computers, administrators can blacklist the undesirable file extensions. You define this list in jabber-config.xml, either with a text editor of your choice or by using the config generator (now hosted at www.ciscojabber.io). The  disallowed_file_transfer_types policy element is supported by all current Jabber clients: Windows, Mac, iOS and Android.

The list you specify must be semi-colon separated, without spaces, and include the period. Example:
<?xml version="1.0" encoding="utf-8"?>
<config version="1.0">
  <Policies>
    <Disallowed_File_Transfer_Types>.exe;.reg;.msi</Disallowed_File_Transfer_Types>
  </Policies>
</config>

So, which file extensions should we block? I suspect many skip the configuration - or worse, disable file transfer entirely - solely because the hurdle of determining an adequate list seems daunting. In this case, we can look to email for guidance and Microsoft provides us a good starting point with their support article Blocked attachments in Outlook. Here's that list in a readily consumable (i.e. copy and paste) list:

.ade;.adp;.app;.asp;.bas;.bat;.cer;.chm;.cmd;.com;.cpl;.crt;.csh;.der;.exe;.fxp;.gadget;.hlp;.hta;.inf;.ins;.isp;.its;.js;.jse;.ksh;.lnk;.mad;.maf;.mag;.mam;.maq;.mar;.mas;.mat;.mau;.mav;.maw;.mda;.mdb;.mde;.mdt;.mdw;.mdz;.msc;.msh;.msh1;.msh2;.mshxml;.msh1xml;.msh2xml;.msi;.msp;.mst;.ops;.pcd;.pif;.plg;.prf;.prg;.pst;.reg;.scf;.scr;.sct;.shb;.shs;.ps1;.ps1xml;.ps2;.ps2xml;.psc1;.psc2;.tmp;.url;.vb;.vbe;.vbs;.vsmacros;.vsw;.ws;.wsc;.wsf;.wsh;.xnk

Additional internet sleuthing suggested a few additions to that list:

.bin;.paf;.job;.inx;.isu;.sys;.dll;.jar;.rar;.ocx;.application;.fon;.vbscript;.action;.command;.osx;.run;.workflow;.ipa;.sysconfig;.apk

This is certainly an incomplete list but it's better than leaving the field blank and allowing everything. See one I missed? Please add it in the comments!


13 February 2016

Verify that a CA-signed X.509 certificate matches the CSR from your Cisco Collaboration server

The use of Certificate Authority (CA)-signed X.509 (aka TLS or SSL) certificates with Cisco's Collaboration products has risen substantially in the last few years since Cisco Jabber began performing certificate validation, the migration to web-based clients such as Cisco Finesse, and the IT industry woke up on the topic of security. The problem is that many of the certificates being purchased are secretly missing important requirements Cisco included in the Certificate Signing Request (CSR). It's important to verify what you asked for in the CSR actually matches what the CA included in the certificate they issued you.

This is an important step to perform before you install the certificate because a CA can omit anything in the signed certificate that it doesn't like from the CSR. If you catch the omission before uploading the signed certificate to the server you can work with the CA to reissue the certificate with the existing CSR after fixing the mistake; however, once you upload the certificate a new CSR will be required. Generating a new CSR may have cost implications from the CA.

Cisco's Platform Administration GUI does not validate that every last bit of the certificate matches exactly what was in the CSR. It seems to only check that the Common Name (CN) and Subject Alternate Name (SAN) attributes are consistent. Two important attributes that it doesn't validate are the Key Usage and Extended Key Usage attributes. Cisco's Operating System Administration Guide dedicates an entire section to these two attributes because they define what the certificate can be used for.

It is worth noting that each product has a separate OS Administration guide but only the CUCM document specifically states that "Tomcat does not require the Key Agreement or IPsec End System key usage" abilities. I have interpreted this as a documentation defect on the other products because all of them - including CUCM - include these abilities in their self-signed certificates and older versions of the OS Administration guide for CUCM prior to version 9.1 did not include this statement. Having said that, I am unaware of an actual defect ID to support this conclusion.

How To Decode the CSR, Certificate, and Identify a Problem

The easiest way to accomplish this is using OpenSSL which is likely to already be installed if you are using GNU/Linux or Apple OS X. For those on Microsoft Windows you can install Cygwin.

Viewing the CSR

The terminal command openssl req -text -noout -verify -in myCsrFilename.csr
will return the following output (shown in graphical and textual form for accessibility):
Terminal output showing a decoded CSR. Identifiable details have been redacted.
Figure 1 - OpenSSL Decode of a CSR

Plain Text Output of CSR Decode

[redacted computer name]:Downloads jschulenberg$ openssl req -text -noout -verify -in [redacted filename].csr
verify OK
Certificate Request:
    Data:
        Version: 0 (0x0)
        Subject: C=US, ST=[redacted], L=[redacted], O=[redacted], OU=[redacted], CN=[redacted server's DNS FQDN]/serialNumber=[redacted]
        Subject Public Key Info:
            Public Key Algorithm: rsaEncryption
            RSA Public Key: (2048 bit)
                Modulus (2048 bit):
                    [redacted hexadecimal text of public key]
                Exponent: 65537 (0x10001)
        Attributes:
        Requested Extensions:
            X509v3 Extended Key Usage: 
                TLS Web Server Authentication, TLS Web Client Authentication, IPSec End System
            X509v3 Key Usage: 
                Digital Signature, Key Encipherment, Data Encipherment, Key Agreement
            X509v3 Subject Alternative Name: 
                DNS:[redacted server's DNS FQDN], DNS:[redacted server's DNS FQDN], DNS:[redacted cluster DNS CNAM], DNS:[redacted organizational TLD], DNS:[redacted cluster DNS CNAM]
    Signature Algorithm: sha256WithRSAEncryption
        [redacted hexadecimal text of signature]
[redacted computer name]:Downloads jschulenberg$ 

Note the details within the Requested Extensions section that has been highlighted red for visibility. In the next section you will see a decoded certificates that is missing some of this detail.

Viewing the CA-Signed Certificate

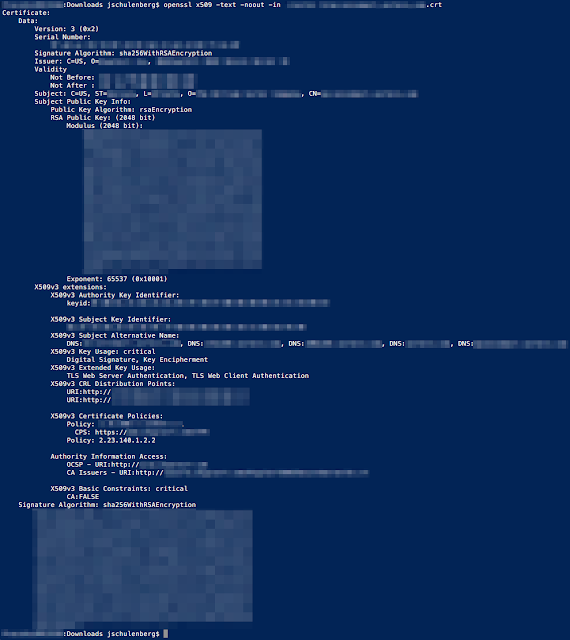
The terminal command openssl x509 -text -noout -in myCertFilename.crt
will return the following output (shown in graphical and textual form for accessibility):

Terminal output showing a decoded certificate that is missing Key Usage and Extended Key Usage abilities compared to the CSR. Identifiable details have been redacted.
Figure 2 - OpenSSL Decode of a Certificate

Plain Text Output of Certificate Decode

[redacted computer name]:Downloads jschulenberg$ openssl x509 -text -noout -in [redacted filename].crt
Certificate:
    Data:
        Version: 3 (0x2)
        Serial Number:
            [redacted hexadecimal text of serial number]
        Signature Algorithm: sha256WithRSAEncryption
        Issuer: C=US, O=[redacted], CN=[redacted]
        Validity
            Not Before: [redacted]
            Not After : [redacted]
        Subject: C=US, ST=[redacted], L=[redacted], O=[redacted], CN=[redacted server's DNS FQDN]
        Subject Public Key Info:
            Public Key Algorithm: rsaEncryption
            RSA Public Key: (2048 bit)
                Modulus (2048 bit):
                    [redacted hexadecimal text of public key]
                Exponent: 65537 (0x10001)
        X509v3 extensions:
            X509v3 Authority Key Identifier: 
                keyid:[redacted hexadecimal text of key identifier]

            X509v3 Subject Key Identifier: 
                [redacted hexadecimal text of key identifier]
            X509v3 Subject Alternative Name: 
                DNS:[redacted server's DNS FQDN], DNS:[redacted server's DNS FQDN], DNS:[redacted cluster DNS CNAM], DNS:[redacted organizational TLD], DNS:[redacted cluster DNS CNAM]
            X509v3 Key Usage: critical
                Digital Signature, Key Encipherment
            X509v3 Extended Key Usage: 
                TLS Web Server Authentication, TLS Web Client Authentication
            X509v3 CRL Distribution Points: 
                URI:http://[redacted]
                URI:http://[redacted]

            X509v3 Certificate Policies: 
                Policy: [redacted OID of CA]
                  CPS: https://[redacted]
                Policy: 2.23.140.1.2.2

            Authority Information Access: 
                OCSP - URI:http://[redacted]
                CA Issuers - URI:http://[redacted]

            X509v3 Basic Constraints: critical
                CA:FALSE
    Signature Algorithm: sha256WithRSAEncryption
        [redacted hexadecimal text of signature]
[redacted computer name]:Downloads jschulenberg$ 

The Problem

Compare the Key Usage and Extended Key Usage attributes in the CSR with what the CA chose to include in the signed certificate. In this case, the Key Usage attribute is missing Data Encipherment and Key Agreement while Extended Key Usage is missing IPSec End System. As mentioned above, that Tomcat certificates do not require IPSec End System or Key Agreement but that leaves us without the required Data Encipherment ability.

The Upload Certificate dialog will accept this certificate even though it does not meet Cisco's stated requirements.  If you see this you should stop before uploading the certificate to the server and contact the support team of your CA to ask that they reissue the certificate exactly as the CSR requested it. As is usually the case: extra effort today prevents exasperation and orders of magnitude more effort expenditure later.

Avoid Problems with Subject Alternate Names

Another common pitfall arrises when the CSR includes a Subject Alternate Name (SAN) attribute. This will be present if either the set web-security command was used to add a SAN to an individual server (e.g. a user friendly FQDN such as myphone.domain.tld) or when using the Cluster-wide Multiserver Certificate Support introduced in CUCM and CUC version 10.0.

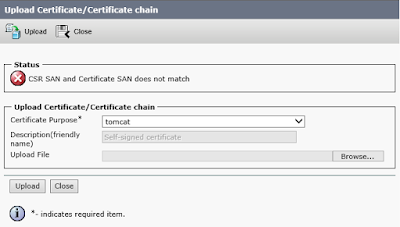
Some certificate authorities will copy the CN into the SAN when issuing the certificate. Since the Platform Administration GUI validates that both the SAN attribute matches exactly between the CSR and signed certificate, this will cause the uploading of the certificate to fail.
The Upload Certificate dialog of Platform Administration showing an error that CSR SAN and issued certificate SAN do not match.
Figure 3 - Upload Certificate Dialog

To avoid this problem you must include the value of the CN as one of the SAN(s) when generating the CSR. The Generate Certificate Signing Request dialog in Platform Administration will allow you to add any Subject Alternate Name you wish after choosing a Distribution type of Multi-server(SAN).
Generate Certificate Signing Dialog of a Multi-server Tomcat certificate where the CN has also been added as a SAN entry.
Figure 4 - Generate Certificate Signing Request Dialog

20 October 2015

Share Your SecureCRT Configuration Between OS X and a Windows Virtual Machine

One of the quintessential tools for a network engineer is SecureCRT from VanDyke Software. Every senior engineer has it and those starting their careers sweat the purchase price before eventually succumbing to the peer pressure. As an engineer uses it they curate a list of saved sessions and non-default preferences that give SecureCRT a glove-like fit.

Then you get a MacBook Pro. SecureCRT even has a great native OS X app. Hooray! Except, you still end up running virtual machine (e.g. Parallels for Mac or VMware Fusion) to isolate VPN connections from your host OS X instance. Regardless of whether the virtual machine operating system is Microsoft Windows or a second instance of OS X, it leaves you with two disparate configurations of SecureCRT.

This post outlines how I have shared the configuration from both my host computer's OS X instance as well as a Windows virtual machine running within VMware Fusion 8.

This post was inspired by Joe Wilson's article on RouterFreak.com titled Keep SecureCRT Synchronized Between Computers with Dropbox. The difference is that I only needed to share the configuration within the confines of a single physical computer.

Part 1: Moving your Amazing Configuration Into Place

Ultimately, we will use the Shared Folders feature of VMware Fusion to share the configuration. The first step in this process is to get the configuration to a location that is easy to access from within the virtual machine.
  1. Open Finder, select the Go menu, hold down the Option key, and select Library.
  2. Navigate to ~/Library/Application\ Support/
  3. Locate the VanDyke folder, alternate-click on it and choose Copy.
  4. Choose Documents from the Favorites Sidebar.
  5. Alternate-click in the Documents folder and choose Paste.
  6. Optionally, rename the folder to something more obvious. I choose SecureCRT Config.
  7. At this point your Finder window should look similar to this:

Finder Window Showing VanDyke folder copied inside of Documents

Part 2: Enabled Shared Folders

Shared Folders are hugely useful because they allow your virtual machine local access to the host OS X file system without duplicating data. In fact, I highly recommend using this feature instead of installing Box, Dropbox, or Google Drive apps within the virtual machine so the local storage only has one copy of each file.

All we need to do in this section is verify that the virtual machine can see the path you copied the config folder to.
  1. Choose Virtual Machine > Settings from the Fusion menu.
  2. Select Sharing from the settings dialog.
  3. Assuming you followed the Part 1 steps and moved the folder inside of your Documents, check the Documents box under Mirrored Folders.
  4. At this point the settings window should look like this:
    Note: This screenshot shows additional items shared than what is required to complete this task. This is for awareness only.
Virtual Machine Settings Window Reflecting the Documents Folder is Mirrored

Part 3: Update the Configuration Path in Both SecureCRT Instances

 On the Mac

  1. Launch SecureCRT
  2. Choose SecureCRT > Preferences from the OS X menu bar
  3. Select General > Configuration Paths
  4. Select the ellipses to the right of the Configuration data is stored in the location below text box. This will open a Finder dialog.
  5. Locate the config folder and then press Choose. If you followed the steps in Part 1 the path would be /Users/<username>/Documents/SecureCRT Config/SecureCRT/Config
  6. Press OK twice, once to acknowledge that you must exit and relaunch SecureCRT and a second time to commit the change.

On the Windows Virtual Machine

  1. Launch SecureCRT
  2. Choose Options > Global Options from the menu bar
  3. Select General > Configuration Paths
    Select the ellipses to the right of the Configuration data is stored in the location below text box. This will open an Explorer dialog.
    Locate the config folder and then press Choose. If you followed the steps in Part 1 the path would be Z:\Documents\SecureCRT Config\SecureCRT\Config
  4. Press OK twice, once to acknowledge that you must exit and relaunch SecureCRT and a second time to commit the change.
 
When you reopen SecureCRT on the virtual machine it should now have all of the saved sessions and other preference changes you have made on your Mac (e.g. foreground and background colors).